This tool predicts and compares the spin of all paddles given any user-defined set of inputs such as incident spin, speed, trajectory, angle, and coefficient of friction. In depth analysis of how and why the spin is what it is. Graphic analysis of all the essential variables and analysis parameters are presented, including contact velocity, coefficient of friction, normal force offset, spin ratio, tangential coefficient of restitution, changes in spin and speed, friction reversals, sliding and gripping ranges, and the angle of maximum spin.
Rumor has it that pickleball noise can be annoying. Many sound mitigation strategies have been implemented to reduce the sound in residential areas. But what can be done about the sound itself, before it needs mitigation? Can it be reduced or modified at the source without sacrificing performance or the aesthetic enjoyment of the game? Changing the nature of the impact sound first requires understanding that sound. Even when measured as equally loud, each paddle is perceived as sounding more or less annoying than others. Every paddle has a signature sound profile. Understanding the causes and mechanisms of that difference is key to modifying the sound. That is the primary aim of this research.
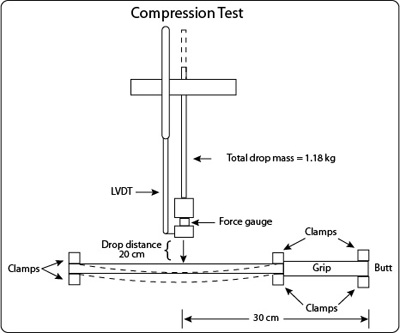
According to intuition, belief, assumption, and marketing, there is a connection between paddle thickness, stiffness, and core material that manifests in power (shot speed). Beliefs run the gamut saying any one of these properties either increases or decreases power. But whatever is believed, it is usually quite adamant, in spite of other's equally staunch defense of the opposite. Likewise, manufacturers make seemingly contradictory claims about their paddle compared to others. Without measurement, making sense of all this is difficult. This experiment puts all these assumptions to the test.
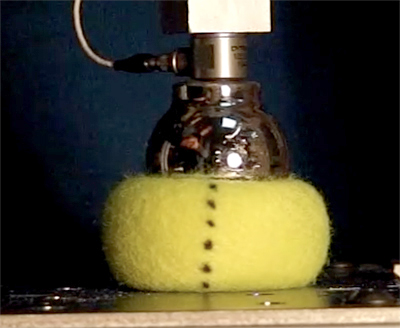
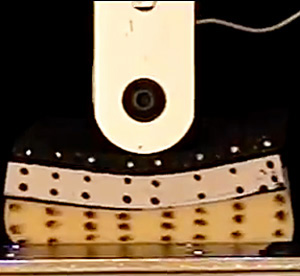
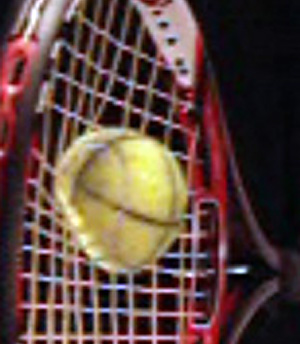
Impact between pickle ball and a rubber surfaced paddle.
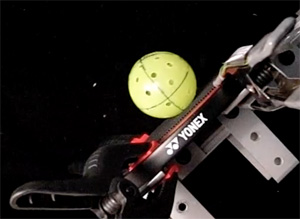
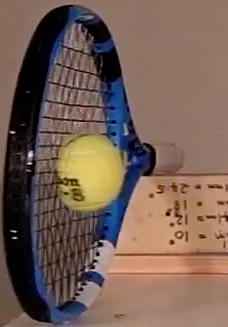
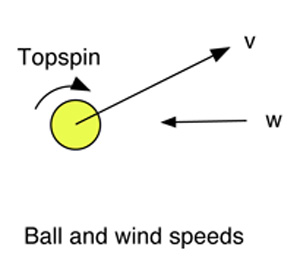
The pickleball equipment rules forbid any surface features that allow a player to impart "excessive" spin to the ball. A rubber surface is explicitly referenced as one such feature. Why? To find out, a table tennis rubber was secured with double-sided tape to the hitting face of a pickleball paddle. Balls were fired at incident angles from 10-90 degrees to the surface and the rebound spin and speeds were recorded. The rubber-surface paddle produced twice the spin of the non-rubber paddle and about 14% more velocity.
Spin generation is a hot topic these days because several pickleball paddles have been designated illegal for play due to their rough surfaces and assumed influence on spin. But is this really true? Does spin depend on surface roughness? If so, how and in what circumstances?
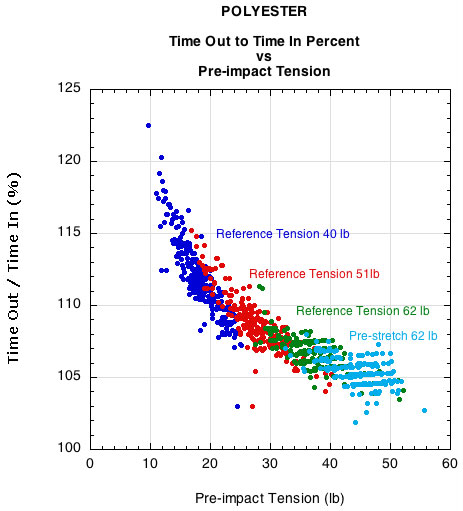
Tennis players maintain that changes in either the string tension or material can make large differences in ball speed and its associated "feel." The findings of this experiment show that string tension and material have only a small effect on ball speed, even while having a more significant affect on the feel parameters, at least at lower tensions.
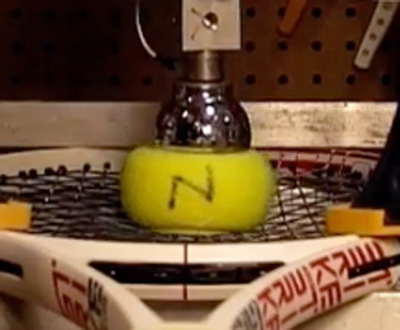
What is the fastest ball? The stiffest? Tennis balls were dynamically tested with a "ball basher" device. Fourteen ball models from 6 companies were tested for energy return, bounce velocity, deformation during impact, stiffness, impact duration, recovery rate, and force load rate at multiple impact energies.
How does the ball know how fast to bounce from a beam or a racquet? You say that is a silly question — it is determined by the forces of the collision which depend on the properties of the colliding objects. Well, yes, but how do the colliding objects know their own properties? Again, a silly question, you say. They just are. Mass, length, balance, and stiffness of an object just are . . . or so you think.
The center two mains were tensioned to 60 lb with each adjacent main decreasing in tension by 5 lbs, with the last string at the periphery at 20 lb on each half of the racquet. The cross strings were all tensioned at 50 lb. Did this variable string tension method to produce more spin?
Factors that might affect racquet control were investigated by setting up a simple experiment where a tennis ball was fired from a ball machine to impact a hand-held racquet at rest. Speed, angle and spin were measured for rebounds from the racquet in its natural condition and with mass added.
Experiments analyzing racquet performance during collisions with tennis balls use several methods to secure the racquet — free-standing, hand-held, head-clamped, and handle-clamped. The concern is that the securing method can alter performance. Each method allows or prevents certain degrees of freedom of movement. All have major drawbacks except free-standing and hand-held. The main concern between these two is that although a hand-held racquet allows all degrees of freedom of motion, it may alter the magnitude of these motions and thus the performance and assessment of the racquet. The theoretical consensus is that the ball leaves the strings before it receives any information from the handle on whether it is hand-held or free. We test that here.
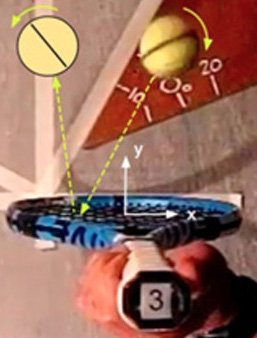
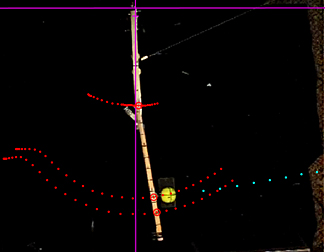
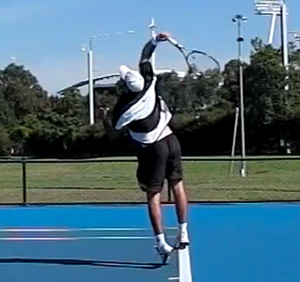
Just because you swing upward does not mean you will get topspin, swinging down does not mean you will get backspin, and swinging flat does not mean no spin. You can get top, back, and no spin from all swing trajectories. Using 18 videos of simple demonstrations and the technique of drawing "relative path" diagrams, this experiment explains the how and why of rebound spin and direction.
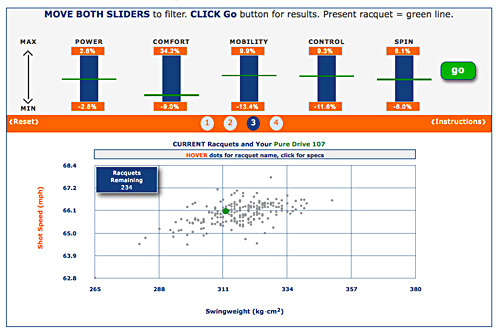
The Racquet Recommender tool helps players find racquets that have more or less of user designated performance properties: Power, comfort, control, maneuverability, and spin. The player's current racquet is represented by the green line on each slider, and as the sliders are moved, racquets (dots on the graph) disappear or appear. The details and comparisons of these recommended racquets are obtained by clicking the green go button.
Ever since tennis was first introduced as a serious sport, players have been blaming their racquet or the ball for the mistakes they make. That is why professional players need six identical racquets each match, all freshly strung, and why each ball is closely inspected for fluffiness before it is deemed suitable to be served. Any tiny variation is enough to throw even a professional off balance. How then do players cope with changes in air pressure, temperature, humidity, ball mass and diameter, fuzziness, altitude, wind? All of these factors affect the flight of a ball through the air, so they affect where the ball lands.
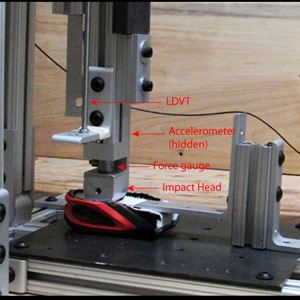
Cushioning is an important performance characteristic of tennis shoes. It is accomplished by altering the geometry, thickness, location and combination of sole materials. Studying a shoe as an entity allows one to assess the cushioning properties of the shoe as a whole. We, instead, were interested in how singular, uniform foams behave when exposed to dynamic impact loads similar to those experienced during foot plant. Knowing how a foam behaves in the general case allows extrapolations about individual footwear components, shoes, and performance.
For tennis players, the primary factor determining purchase of a tennis shoe is comfort. For researchers and manufacturers, injury prevention is a main area of interest, concern and design. For both groups, heel and forefoot cushioning and stability is the common denominator between comfort and injury reduction. The objective of the experiment was to examine cushioning effects at different impact energies for both heel and forefoot, determine how stiffness affects cushioning and the player's response to it, and to compare multiple shoes on all parameters.
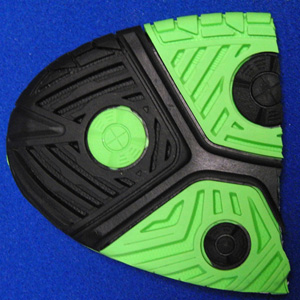
Traction is specific to the particular shoe-surface interface. Different surfaces will create different forces with the same shoe, and different shoes will create different forces with the same surface. These resultant traction forces are required for performance, but the open question is how much traction is required for tennis movements on a particular shoe-surface interface, how much is available, and how much is too much, contributing to many lower extremity injuries? In search of answers, a test rig was developed to measure translational and rotational traction. The initial findings are presented here.
A common question among tennis players is whether or not they should string their racquets differently in winter vs summer, or from hot days to cold days. It is common knowledge that most strings lose a large percentage of tension with time and play. The amount is highly material specific, with gut, nylon, and polyester losing the least tension in that order. Do variations in temperature exposure affect tension loss in these materials differently? Does it matter when the string is exposed to a temperature extreme — before, during, or after tensioning? How do variances in tension loss due to temperature changes affect the most important property of string — stiffness?
Tennis players have long held that rough-surfaced strings will create more spin. The belief is that the roughened string will more vigorously grab the backside of the ball as the racquet sweeps up and drags the ball around into topspin. Is this true? How much extra spin can a player expect?
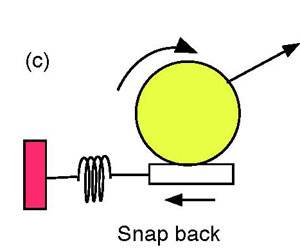
It has also been thought that lateral string movement produces extra spin during the "snap-back" phase of the impact. This study shows that "snap-back" is only half the story and is a partial misrepresentation of actual events.
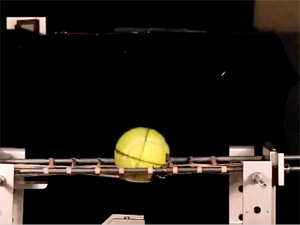
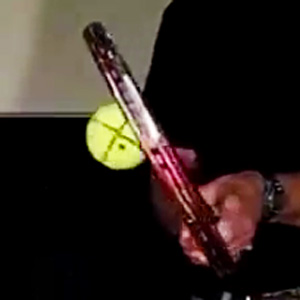
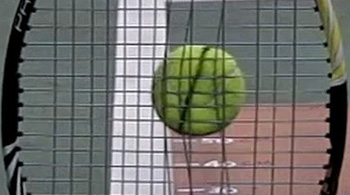
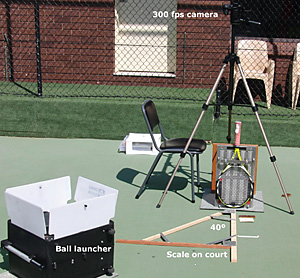
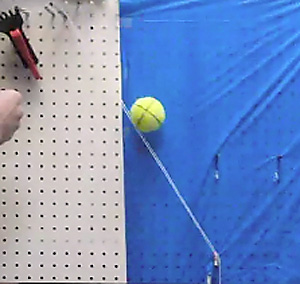
The physics of tennis ball spin is revealed as impacts with a simplified stringbed of four mains (with and without crosses) are viewed through a see-through plexiglass frame.
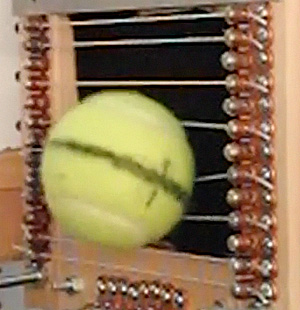
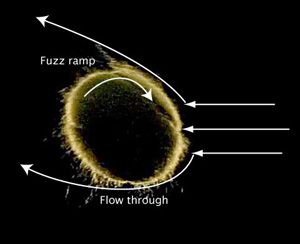
The interaction between a tennis ball and the strings of a tennis racquet is a relatively complicated process since adjacent strings tend to act independently. All of the strings tend to move in unison in a direction perpendicular to the string plane, but motion in a direction parallel to the string plane can vary from one string to the next. Some strings move tangentially more than others, or in opposite directions, depending on whether the ball lands directly on one or more of the strings or whether it lands between two strings. In order to simplify the physics of the problem, a study was made of the interaction between a tennis ball and a single string.
What effect does the addition and redistribution of mass have on racquet speed, control, feel and ball speed? Players have many varied and conflicting opinions as to where and why lead tape should be added to the racquet. This in-depth study answers all your questions.
More
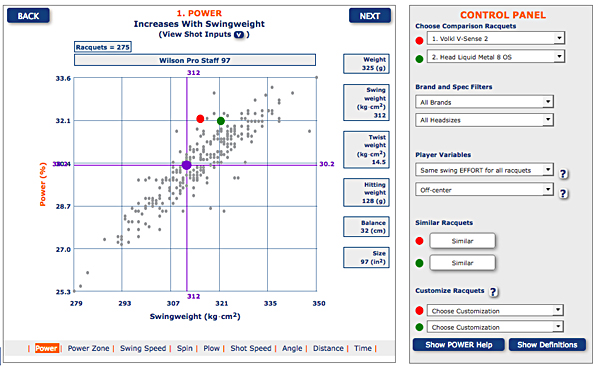
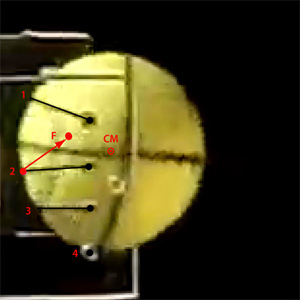
The relationships between racquet weight, balance (center of mass — CM), swingweight (moment of inertia — I), swing speed and shot speed are often topics of much confusion among tennis players. Questions arise such as, "How can a heavier racquet swing easier than a light racquet?"; "How can a head-heavy racquet have a lower swingweight than a headlight racquet?"; "Does making a racquet more headlight increase its racquet tip velocity?"; Is it true that adding weight at the axis of rotation has no affect on the swingweight and thus the racquet speed?"; "Does more mass create more plow-through?"; "Does a heavier racquet create more ball speed?"; "Is there a trade-off between racquet mass, racquet speed, and ball speed?".
Spin is an essential part of today's game of tennis. Racquet and string advertising proclaim the spin benefits of particular products and players agonize over which racquet-string setup will generate the most spin. But how do you choose? What factors really matter to spinning a tennis ball? Why do they matter? How do you maximize the effect of those causal factors?
The tennis world has gone topspin crazy and players want equipment that maximizes spin. Over the years there have been many theories as to what equipment configurations will increase spin. The string pattern has often been hailed as the principle spin motor. Is it? What patterns produce the most spin?
One of the mysteries concerning the kick serve is how the server manages to generate topspin in the first place. If the racquet needs to rise at 30 degrees to hit a good topspin forehand, how can anyone serve a ball with a significant amount of topspin when the racquet head is rising at only a few degrees?
Tennis players often complain that a tennis string, especially polyester string, "goes dead." This phenomenon has various and often contradictory descriptions. Some players experience too much stringbed action and others feel complete loss of stringbed action. And these contrary opinions can be about the very same string. How can two completely opposite descriptions of a string going dead be correct? Well, as this research will show, it seems that they can.
Part 1 dealt with several ways that strings "go dead. This experiment addresses another factor not addressed there — loss of elasticity due to an internal fatigue and breakdown of the string. This is often the explanation of players who experience string death as a loss of power. But is it true? Do strings go dead because of loss of elasticity due to an internal fatigue and breakdown of the string? What does science say?
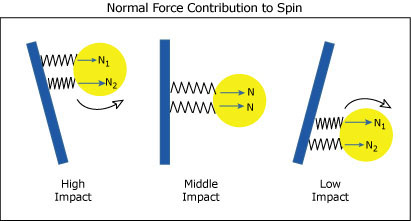
The optimization rules for spin appear to be "Goldilocks Principles": the stringbed must be not too soft and not too stiff, not too closed and not too open, and not too rough and not too smooth. You can have too much or too little of each.
More
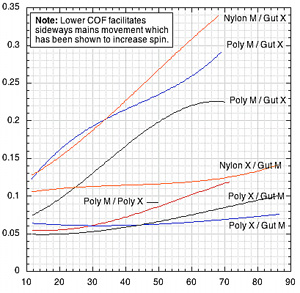
Until recently, the prevailing theory regarding string stiffness and spin has been that the firmness and lateral rigidity of a stiffer string will create more ball-to-string friction due to more squashing and embedding, resulting in more spin. It is true that friction accounts for most of the spin produced by the stringbed, but it does not account for most of the difference in spin between stringbeds. Recent research suggests that lateral main string movement is the most important factor determining this difference. Consequently, the explanation of how string stiffness might affect the spin differential has changed. The question now becomes, "How does string stiffness affect sideways string movement and its associated storage and return of rotational energy to the ball?"
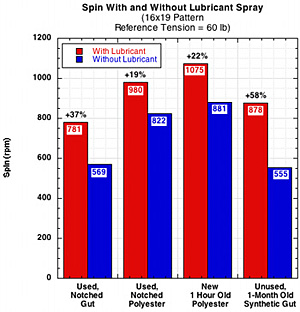
Lateral movement and snap-back of the main strings has been shown by TWU to increase spin? Lateral movement is facilitated by using strings with a low string-to-string stickiness. These strings are usually stiff, hard polyester strings with low friction, minimal notching, and no fraying. But what would happen if we added lubrication to any string whether polyester, gut, or nylon, used or new? Would this increase the relative string movement of each string and, with it, the spin of the ball? To find out, we added WD-40 to all strings.
Aerodynamic forces are responsible for both the angular, diving, hopping, topspin shot and the floating, skidding, backspin slice. What makes the ball appear to suddenly change course and dive into the court or to seemingly defy gravity and float through the air?
More
Tennis is a game of spin, and much attention is devoted to the mechanics and equipment for producing it. Much less attention has been given to what makes spin work for the player — aerodynamics. Other than gravity, it is the flow of air around the ball that determines its trajectory when hit at any given velocity, spin, and angle. Forces created by air flow act to decrease velocity in the direction of motion (primarily the horizontal direction in tennis) and, for spinning balls, act to increase or decrease its vertical or side-to-side speed.
Tennis players have claimed for many years that some tennis strings generate more spin than others. Court-side mythology had it that stiff strings that flattened and embedded the ball as well as grabbed it with high friction surfaces increased spin. This experiment was one of the first to discover that material matters, but not for the reasons most players think.
Can players maximize spin production by customizing twistweight depending on where on the stringbed they usually make contact? Experiment explores the surprising result that impact location matters and twistweight is the key to how much it matters.
Main strings that move sideways and snap-back can create more spin. To achieve maximum spin, you must get the string moving, keep it moving both to and fro, and do so quickly with as little loss of energy as possible. Minimizing friction between strings is essential to this process.
Strings vary dramatically in string-to-string friction, and hybrid combinations accentuate that difference for better or worse in unexpected and counter-intuitive ways.
Videos of various stringbed setups show that string movement does indeed occur and that the strings snap back for all setups and they do so, for the most part, in less than 1/1000 second.
The complex interaction between the forearm and the racquet is nicely described in terms of the physics of a double pendulum. Players don't worry about that since they know from experience what happens to the racquet when they swing their arm or use their wrist to position the racquet. However, they may not be aware of some of the fine details.