ABSTRACT
A pendulum device was constructed to simulate the swing of a hockey stick and the collision with the puck. Because the physical principles of the stick-puck collision are independent of particular materials or implements, simulated swings, sticks, and pucks were adequate to the task. The goal of the study was to see how puck velocity varied with "stick" stiffness, "hand" position, kick point (bending location), and preloading (hitting ice before puck) vs no preloading. It was found that velocity declines with stiffness and with lowering the hand on the stick and that preloading the stick on the ice is much more effective than not preloading and simply hitting the puck. In fact, preloading the stick resulted in superelastic collisions, as defined by the coefficient of restitution. The primary conceptual and pedagogical take-away is that maximum puck speed is achieved by maximum blade speed, which is the sum of the linear and bending speeds at the stick impact location.
1. INTRODUCTION
The slap shot is the most spectacular and effective shot in hockey. It is typically performed in six stages. The stick is swung back in the backswing, swings down and forward in the downswing, hits the ice and bends the stick in the preload stage, contacts and accelerates the puck in the loading stage, shoots the puck in the release stage, and then follows through. The signature characteristic of the slap shot is the slap of the ice prior to hitting the puck. This slap begins the preloading phase that initiates bending of the stick, where some of the kinetic swing energy is converted into elastic bending energy. Additional energy is added by the player who can exert a greater bending force against the ice than already achieved due to the stick-ice collision. The player pushes down and forward, increasing and maintaining the bend until puck contact, which bends the stick further. The stick then begins to snap back, transferring the stored elastic energy to the puck. The elastic energy is added to the kinetic energy to propel the puck. As discussed below, the most important result of this flow of energy is to maximize the speed of the blade at the time of puck release.
Because the loading of the stick is so important to achieving maximum puck velocity, hockey stick manufacturers design features into the stick to optimize its flexing and snap-back properties. The primary property that influences stick bending is stiffness. The stiffness of graphite composite hockey sticks can be varied by altering the material and direction of fiber as well as altering the shape and thickness of the shaft. The stiffness may be uniform throughout, or it can be varied at any location along the stick's length. Varying the stiffness affects the amount and location of bending and the force required to do so.
However, there is no unanimous agreement as to what flex profiles maximize puck speed. Research results are mixed. Some researchers have found that flexible sticks produce greater speed, some that stiff sticks are more effective, and others still who found little difference. There is little agreement as to how much and where to vary the stiffness in order to increase puck velocity or even whether there is any efficacy of doing so in the first place [1-5].
Part of the difficulty to ascertaining the ingredients of maximum stick power is the built-in ambiguities of the two types of research methodologies: the on-ice player testing experiments and the in-lab simulated experiments. The numerical results often do not agree. The reason is that the stick influences the player and the player influences how the stick performs. Therefore it is difficult to generalize or extrapolate from player-based experiments. On the other hand, lab-based experiments can determine the absolute properties of the stick, but the skill, strength, or experience of the player may or may not be able to extract the benefits of a particular stick. But by taking the player out of the equation, we can determine how and under what conditions a stick will generate more or less puck speed. We can keep all input variables constant except one, and then see how that variable affects puck velocity.
Based on a review of the literature, there were 3 questions that seemed unresolved or in need of clarification: (1) Is it more or less effective to hit the ice first before hitting the puck, (2) does a stiffer or softer flex produce more speed, (3) and what is the best location to apply force along the stick (i.e., hand position)? And complementary to these, how is the kick point affected by the answers to questions 2 and 3 (See the experiment on Hockey Stick Kick Points).
2. EXPERIMENTAL ARRANGEMENT
Two variations of a pendulum mechanism were built to simulate the swing of a stick. In one variation, a bungee cord pulled the pendulum arm through contact with the puck (100 g brass weight), regulating a constant speed and force of contact. In the second variation, a pull-weight was used to pull the pendulum arm through contact. In addition, a sliding drop mass was attached to the stick. This mass slid down the stick as the pendulum dropped and was timed to "bottom-out" at "ice" contact. This added extra bending energy to the stick, just as a player does when leaning into the stick after ice contact. The drop mass landed on a spring that increased the duration of loading as the stick slid along the ice. Figure 1 shows the devices and Movie Screens 1 and 2 below show them in operation.
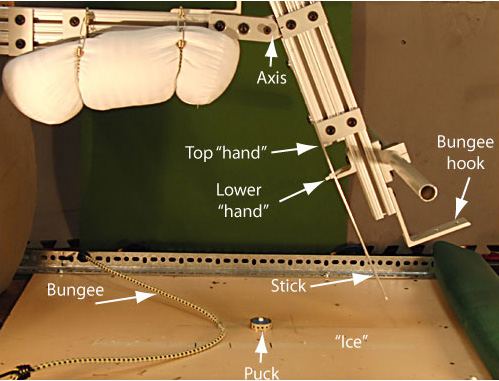
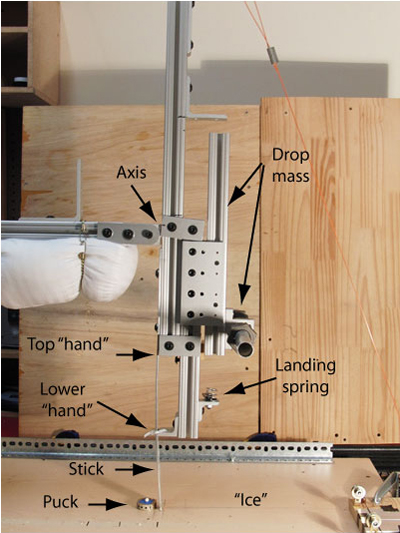
Figure 1 — Two experimental pendulum setups: bungee powered (top) and falling weight powered with drop mass to add bending force (bottom). In the bungee apparatus, the bungee hooks around the angle brace at the bottom of the pendulum. The pendulum is then pulled back, released, and the bungee pulls the pendulum forward through puck release. For the drop weight setup, a 5 lb weight is attached to a pull line at the top of the pendulum. The pendulum was swung through a fixed angle and the drop weight dropped from a fixed height. The pendulum is released and the weight pulls the pendulum through puck release and the drop mass descends to the landing spring just after the stick makes table contact. The "lower hand" is shown in different positions in the photos.
Movie Screens 1 and 2 present the experimental setups in slow motion action.
Bungee Powered Stick
Movie Screen 1 — Bungee powered pendulum. The stick hits the table top ("ice"), slows, and bends before hitting the puck. It then bends more at puck contact. The combination of rotational and elastic energy drive the acceleration and release of the puck. Not all the energy goes into the puck as evidenced by the continued follow-through of the pendulum arm and the vibration of the stick. (Note: By using the forward and backward double arrow keys, you can go forward and backward a frame at a time.)
Pull Weight Stick With Drop Weight Loading
Movie Screen 2 — Drop Weight Mechanism. As in Movie Screen 1, the stick hits the ice and puck and bends, but the drop mass increases the bending. The drop mass descends as the pendulum rotates. At, or just after, ice contact, the drop mass contacts the spring and begins loading the stick for the next couple of frames. (Note: By using the forward and backward double arrow keys, you can go forward and backward a frame at a time.)
An aluminum beam (305 mm long, 37 mm wide, and 3 mm thick) was used as a stick. The beam was bolted to the pendulum and could be easily adjusted up and down to allow for different degrees of slapping and sliding along the table (referred to as the "ice") before hitting the puck. The stiffness of the stick was altered by attaching a second beam to the first with double sided tape or a bolt. The length of the second beam was adjusted to either 46%, 62%, 66% or 100% of the length of the first beam. It extended from the top of the stick downward. Using these different length second beams, the stiffness could be altered either uniformly (using 100%-length beam), or variably (using the 46%-, 62%-, and 66%-length beams). The 66% length beam was also less stiff, being only 2 mm thick instead of 3mm — Figure 2 (66% length not shown).
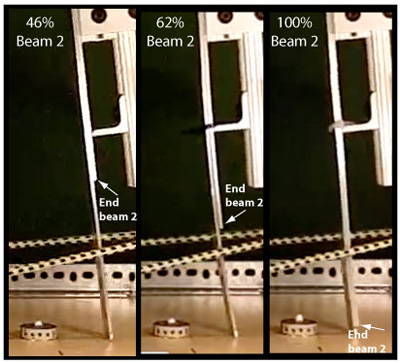
Figure 2 — Variable stiffness sticks. Variable stiffness sticks created by attaching a second aluminum beam (3 mm thick) to the first. Second beam sections were a percentage length of the first: 46% (left), 62% (middle) and 100% (right). The 66%-length (2 mm thick) beam is not shown.
The hand position was adjusted by sliding and tightening the angle brace labeled "lower hand" in Figure 1. The hand positions were located 22%, 31%, and 50% from the top of the stick (the "top hand"). In one instance the data also shows a hand position 74% from the top.
3. RESULTS AND DISCUSSION
(3.1) Does hitting the ice first result in more puck speed?
To an outside observer, it is not intuitively obvious that hitting the ice first will add more velocity to the puck. Quite the contrary. It would seem that hitting the ice simply transforms some kinetic energy into elastic bending energy as the stick slows down upon impact with the ice. As the stick snaps back, it then returns it. Even if stick gave all the energy back, there is no reason that the puck would leave the stick with more velocity. Extra energy must be added to more than make up for the lost stick velocity, bending hysteresis, and added ice friction. But even if extra energy is added by forceful bending of the stick against the ice, is it enough or efficient enough to make it all worthwhile compared to just hitting the puck? One aim of the present experiment was to ascertain exactly that.
(3.2) Collision Theory
NOTE: For most of the theory section we assume a collision with no external forces. It is helpful to be familiar with ideal theory in order to understand the more complicated collisions in both hockey and this experiment. In both, there are external forces. In hockey the player exerts forces throughout puck contact, and in the experiment the pendulum is accelerated throughout by both the driving force and contact with the table-top.
Most people think of collisions in the prototypical billiard ball scenario — two stiff, solid, round objects approaching, colliding, and rebounding from each other. In such collisions, the mass and velocities of the objects are calculated and measured from the center of mass. In most sports, the striker is a long, extended object with the collision occurring at some location distal from the center of mass. That introduces three primary complications. First, most of the mass of the striker is not involved in the collision. Second, because the striker is usually swinging in a circular arc about some axis, each location along the length of the striker is travelling at a different speed. And last, because of the length of the striker, there may be considerable bending of the implement, introducing a strong catapult component to the rebound. These complications will be addressed below.
In most sports that involve hitting an object with a stick of some sort (e.g., tennis and baseball), the goal is to swing the hitting implement as fast as possible in order to propel the object as fast as possible. The actual velocity of the hit object will involve the relative masses, velocities, and stiffnesses of the colliding objects. Given the masses and initial velocities of the colliding objects, we can calculate the resulting velocities using two relationships — the conservation of momentum and the coefficient of restitution.
Conservation of Momentum. This says that the sum of the objects' momentums before the collision equals the sum after (Equation 1a), or equivalently, the momentum lost by one object is equal to that gained by the other (Equation 1b). Conservation of momentum is given by
(1a) MV1 + mv1 = MV2 + mv2
or,
(1b) MV1 - MV2 = mv2 - mv1
where M and m are the masses of the objects and V1 and v1 are the velocities before the collision and V2 and v2 the velocities after. If the initial velocity of the struck object is zero, as in a tennis serve, golf hit, or many hockey shots, then the equation simplifies to MV1 = MV2 + mv2. (Note: The mass of the striker is the "effective mass," Me, not the actual mass. This is essentially how much of the entire mass was used in order to account for the momentum gained by the struck object. For most hockey sticks, the effective mass is about the same as the puck: 170 g. The mass of most performance sticks is around 450 g, so the effective mass is usually around 35-40% of the actual mass. This is discussed in more detail in the Appendix.)
Conservation of momentum requires that there are no external forces to the collision. In a typical sports striker context this is only approximately true because the player is usually exerting a force on the striker throughout the collision. If the duration of the collision is very short, this force can be ignored and the result will be a good approximation. There can be other influences as well. For example, in our pendulum test setup, not only is the pendulum externally driven by a bungee or a falling mass, but there is also considerable friction between the table top and the stick throughout the collision on all preload trials. The bungee tends to accelerate the stick and the friction tends to decelerate it. The consequence of such external forces is that the change in momentum of one object will be more or less than that of the other, indicating that conservation of momentum does not apply — it is not an ideal collision.
Coefficient of Restitution. The second relationship — the coefficient of restitution (COR) — states that the ratio of the relative speeds of the two objects after and before the collision is constant. If there are no external forces, this ratio is a measure of the energy efficiency of the collision. This efficiency is determined by the transformation of kinetic energy of motion into elastic energy and then the retransformation of a percentage of that energy back into kinetic energy as manifested in velocity. COR is given by
(2) e = (v2 - V2) / (V1 - v1)
where e is the coefficient of restitution, V1 and v1 are the velocities of the two objects before the collision and V2 and v2 are the velocities after the collision. The ratio e is greater than or equal to 0 and less than or equal to 1 (0 < e < 1). If e = 1, the collision is completely elastic and no elastic energy is lost. If e = 0, the collision is completely inelastic and loses all the elastic energy. If the initial velocity of the struck object is zero, the equation simplifies to e = (v2 - V2) / V1.
It is important to be clear about the definition of COR and of the variables in Equation 2. If the collision were between two billiard balls, all the velocities would be considered at the center of mass. For a stick-puck collision it is more complicated. The puck velocities (v1, v2) are calculated at the center of mass, but the stick velocities (V1, V2) are calculated for the impact location corrected for any velocity due to bending (the dotted lines in Figure 3). The stick velocity is derived from the rotational velocity of the stick as a whole, not from the actual velocity of the impact point, which includes both rotational and bending velocity. As we will see below, the bending velocity is very important in hockey, perhaps uniquely so compared to other sports, but it is is not part of its calculation or definition — it is simply a measured velocity. The bending in hockey is different from most striker events because most of the bending occurs before the collision and it is of greater magnitude and consequence. In most sport collisions, all deformation, bending, and vibration are considered simply as sources of energy loss. This energy loss is in the form of heat, noise, and of elastic deformation that is too slow to recover and give back energy before the objects separate. In hockey, the bending does lose energy, but it is also the source of superelasticity due to prebending. The prebending adds more energy than it loses.
If there are no external forces (the prebending forces are not considered external unless they persist during the puck collision), then COR is truly a measure of energy efficiency during the collision. If there are external forces, the equation still holds, but then you no longer know how much of the velocity of the separating objects is due solely to the internal properties of restitution and how much is due to the external forces. However, if the external forces and incident parameters are held constant, then COR is still an accurate description of the energy return of the entire experimental configuration. COR can then be used, for example, to compare preload and non-load puck collisions. If all internal and external parameters are the same before and during the impact except hitting or not hitting the ice first, then we will know that differential results are due to the preloading condition. In that case, COR is still a measure of the efficiency of the preload vs the no-load condition.
Each of these equations can be useful by itself if you have measured all, or all but one, of the variables to be known. In that sense the equations are descriptive and analytic. But usually we want them to be predictive. Typically we know the masses and the incident velocities (M, m, V1, v1) of the colliding objects, and we want to predict the rebounding velocities. In this case, we have two unknown variables V2 and v2, so we must solve each equation for one unknown and substitute into the other to find the second unknown. Solving Equation 2 for V2, we get V2 = V2 - e (V1), and substituting V2 into Equation 1 we get
(3) v2 = (1 + e)MV1 / (M + m)
Then, substituting v2 into Equation 1 and solving for V2, we get
(4) V2 = (M - em)v1 / (M + m)
Now equations 3 and 4 can be used to predict the outcome of the collision. All the variables in the calculations are known except the one variable of interest in each equation — v2 or V2.
Knowing v2 and V2, we can rearrange Equation 2 into a very useful form:
(5) v2 = e(V1 - v1) + V2
And when v1 is zero, as it is in these experiments, Equation 5 simplifies to
(6) v2 = e(V1) + V2
Angular, Rotational, Linear, Tangential, Translational Velocity. Equation 6 is especially handy if we now change to stick and puck terminology. It is handy because it is in the form that says puck speed is equal to bending speed plus linear (tangential or translational) speed. However, first we have to define and calculate these types of velocities.
V1 is the tip velocity just before puck impact. During a swing, the stick travels in a circular arc centered about the axis of rotation, usually around the top of the stick or just beyond. As it swings, the stick sweeps through an angle. The speed of that sweep is the angular or rotational velocity, ω. Every point on the stick travels at the same angular velocity. However, each point along the stick's length has a greater linear velocity as its distance from the axis increases. The linear velocity is defined as the instantaneous velocity of a point along a straight line path tangent to the circular arc at that point (i.e., "tangential velocity" and "translational" velocity). For any given point that velocity is given as
(7) v = rω
where v is the linear velocity, r is the distance from the axis of rotation to the point, and ω is the angular velocity in radians per second.
So the tangential, linear velocity of the tip before impact, V1, is the distance from the tip to the axis (r ) times the angular velocity of the pendulum (ω).
Bending Velocity. The linear, tangential velocity is determined solely by the angular velocity of the swing. But that alone does not describe the motion of the tip of the stick. At puck contact, the tip also rotates backward by bending at an effective axis of rotation close to the lower hand position. At maximum bend, the tip must accelerate relative to the rest of the stick to catch back up. This catch-up velocity will be vb = rbωb, where vb is tip bending velocity, rb is the distance from the tip to the lower hand axis, and ωb the angular velocity of the bending vibration about the hand axis. As we will discuss in more detail below, this is the snap-back velocity (or restitution velocity), and it is the e (V1) component in Equation 6. Equation 6 says that the puck velocity is the sum of tip linear velocity (V2) plus tip snap-back velocity e (V1). Figure 3 shows the rotational stick motion (the dotted line) plus the bending motion which occurs "on top" of the rotational.
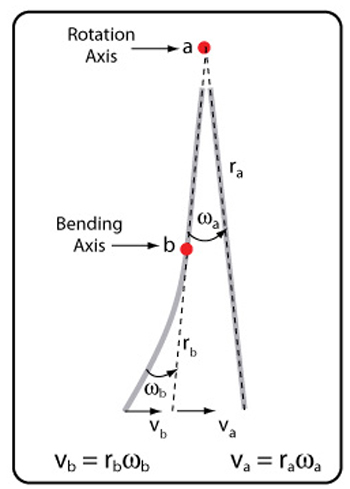
Figure 3 — Stick rotational and bending velocities — vb is the linear bending velocity and va is the linear stick velocity.
(3.3) Experimental Results: Hitting the Puck Directly: Hitting the puck directly comes closest to approximating the ideal conditions described above. Figure 4 shows a direct impact with the puck.
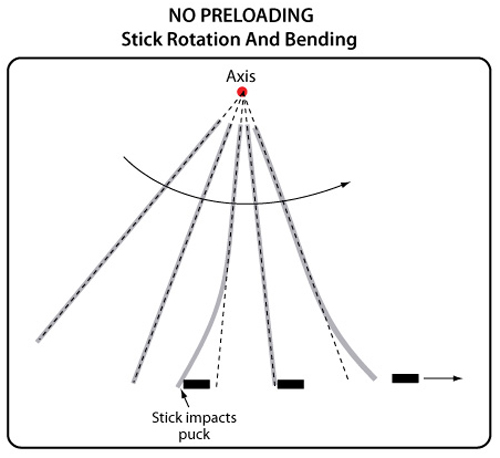
Figure 4 — Stick rotation and bending snap-back for puck-only impact — As the stick rotates forward the tip bends backward upon impact with the puck. Once maximum deflection is achieved, the tip snaps-back to catch up with the rest of the stick, at which time the puck is launched. Launch speed is the speed of the tip, which is the sum of the linear velocity and the snap-back velocity.
An experimental example is shown in Figure 5. Stick speed and puck speed are the same at puck exit (allowing for slight digitization errors). The total tip velocity (red) is the sum of the tip linear (blue) and bending (green) velocities. From Equation 1, the COR of this impact is (5.31-2.94) /3.445 = 0.688, using the linear tip speed as the stick velocity before and after impact. From Equation 6, the snap-back velocity of the tip should be e x V1, or 0.688 x 3.445 = 2.37 m/s. The graph shows that final tip and puck velocity is indeed approximately the linear plus bending velocities.
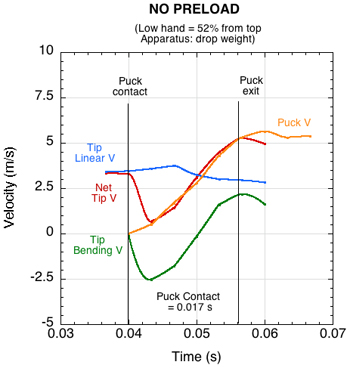
Figure 5 — Puck velocity — Puck velocity is equal to the net tip velocity which is the sum of tip linear and bending (snap-back) velocities.
(3.4) Experimental Results: Hitting the Ice First: The typical collisions presented above describe hitting a hockey puck as if you were hitting a tennis, golf or baseball. One can do that, but most of the time a hockey player hits the ice before hitting the puck, as shown in Figure 6.
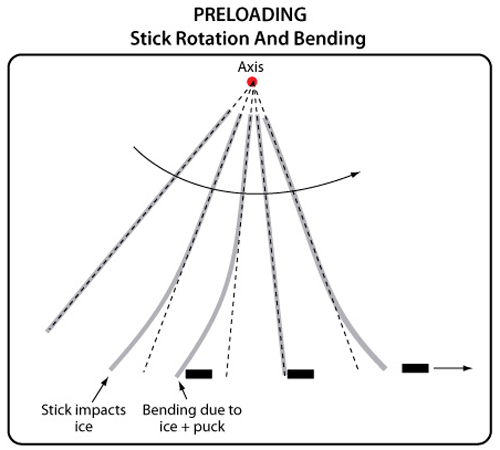
Figure 6 — Stick rotation and bending for hitting the ice before the puck.
This changes everything, tempting many observers to describe the interaction as more like a catch and a throw or a long push than like a collision. Most sports striker collisions are about 1-5 ms, but the stick and puck are in contact for about 40 ms. During this time, the player can increase the speed and bending force on the stick. That is not true for most collisions. How does this change our description of the stick-puck interaction?
Surprisingly, the description of the end result is the same — the puck velocity is equal to the tip velocity which is the sum of the linear velocity plus the snap-back velocity of the bend. Though the description of the end result is the same, the end result is not — the velocities are different. This is because the stick is preloaded with energy when it hits the puck. The collision will proceed as usual, but it will also release the preloaded energy. A collision of this sort is known as a superelastic collision. This is defined as a collision where there is more kinetic energy after the collision than before. A perfect example of such a collision is a bullet hitting a hand grenade which explodes upon impact. Another example, more similar to our situation, is a collision where one of the objects has a compressed spring that is released by the contact of the objects.
In all these cases the extra energy is stored as potential energy (chemical in the explosion and elastic in the spring), and this energy is internal to the colliding system of objects — i.e., it is not added from outside the two objects during the collision. For the hockey stick and puck, most of the energy supplied by the player occurs during the downswing to the ice and during ice contact prior to puck contact. For our experimental arrangement, the extra prebending energy occurs before puck contact. To the extent that this is true, conservation of momentum and the coefficient of restitution will adequately describe the collision. Some external energy is added in the experiment by the bungee or weight pulling the pendulum stick through the impact. However, during the 17-30 ms collision, this is minimal.
Although the tip is preloaded, it will still bend a bit more upon puck contact, but not as much as in a non-preload scenario because a larger force is required to bend the stick the more it is bent. Also because of prebending, the collision duration will be shorter than a non-preload collision where the stick bends all the way back and forth during the collision. The experimental results shown in Figure 7 helps to decipher this.
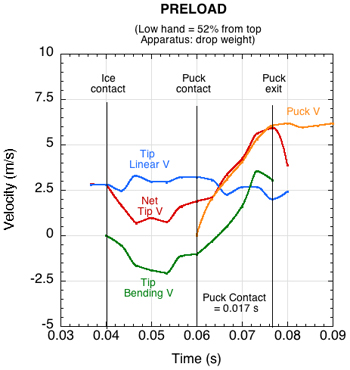
Figure 7 — Velocity components for preloading on ice. As in Figure 4, puck velocity is equal to net tip velocity, which is greater because the bending snap-back velocity is greater after ice contact. The radical slow down of the stick tip after release is due to the bending vibration changing direction.
Just as in the non-preloading example, the final tip speed equals the puck speed, and in this case, both those speeds are greater. At ice contact, the linear tip velocity stays relatively constant but the net tip velocity declines rapidly as the tip is bent backward. As the tip rotates and snaps forward, it strikes the puck, but at a significantly slower speed than in Figure 4. However, during puck contact, the snap-back tip velocity more than makes up for the lower contact velocity and the net tip and puck speed is greater at separation than in Figure 4. The COR of this impact would be given as (v2 - V2) / (V1), or (6.16 - 2.42) / 3.22 = 1.16. Since e > 1, it is a superelastic collision.
The sum of the calculated linear tip speed plus bending tip speed equal both the measured and calculated puck speed throughout the impact.
Table 1 sums up the results for puck velocity for preloading vs no preloading for the three hand positions tested.
| Table 1 Puck Velocity vs Hand Location and Hitting Method (Apparatus: Impact Drop Weight) | |||
| Hand Location From Top (% length) | Velocity (m/s) No Preload |
Velocity (m/s) Preload |
Percent Increase |
|---|---|---|---|
| 52% | 5.43 | 6.25 | 15.1% |
| 30% | 5.46 | 6.9 | 26.4% |
| 20% | 5.47 | 7.35 | 34.4% |
Table 1 — Puck velocity vs preload condition: no preload and preload with extra energy. Velocity increased with both preloading and higher hand position.
(3.5) Stiff of soft stick; High or low hand position — which creates more puck speed?
Stick stiffness was altered in two ways: varying the thickness of the stick and varying the hand position. Hand position affects the stiffness because it determines the length of the bending arm between the ice and the hand. The greater the length, the more the stick will bend. The thickness was varied by adding a 3 different lengths of a second layer of aluminum to the first. These lengths were 100, 62 and 46 percent of the first beam. Table 2 shows the stiffness and puck speeds resulting from these stiffness alterations.
| Table 2 Puck Velocity vs Stiffness and Hand Location | ||||
| Apparatus | Stick Type (lgth) | Hand Location From Top (% length) |
Stiffness (N/m) | Velocity (m/s) Preload |
|---|---|---|---|---|
| Bungee | 1xAlu (306 mm) | 50% | 2357 | 8.77 |
| Bungee | 1xAlu (306 mm) | 31% | 995 | 9.79 |
| Bungee | 1xAlu (306 mm) | 22% | 807 | 9.83 |
| Bungee | 2xAlu (306 mm) | 50% | 4360 | 6.66 |
| Bungee | 2xAlu (306 mm) | 31% | 1938 | 7.41 |
| Bungee | 2xAlu (306 mm) | 22% | 1478 | 7.76 |
| Bungee | 1.62xAlu (306 mm) | 50% | 3114 | 7.91 |
| Bungee | 1.62xAlu (306 mm) | 31% | 1615 | 8.68 |
| Bungee | 1.46xAlu (306 mm) | 46% | 1982 | 8.18 |
| Bungee | 1.46xAlu (306 mm) | 31% | 1453 | 8.91 |
| Bungee | 1.46xAlu (306 mm) | 22% | 807 | 9.19 |
| Drop mass | 1xAlu (300 mm) | 52% | 3711 | 6.25 | Drop mass | 1xAlu (300 mm) | 30% | 1550 | 6.90 | Drop mass | 1xAlu (300 mm) | 20% | 1168 | 7.35 |
Table 2 — Puck velocity vs stiffness Velocity varies with stick stiffness as influenced by material thickness, length, and hand position. (Note: the drop mass apparatus has a slower pendulum so the puck speeds were also slower. Thus they can't be compared directly to puck speeds produced by the bungee powered apparatus.)
For each stick type, the puck velocity increases as stiffness decreases.
4. CONCLUSION
Experienced players in all sports typically know what techniques produce the desired results and what equipment helps attain those results. However, it is also true that this knowledge is often right for the wrong reasons. Until scientific research has been conducted, these observations and beliefs may only be supported by perceptions and myths carried along by the sport for years. Human perception alone is such that it is easy to tell that something has changed in the flight of a puck, for example, but it is more difficult to tell what changed. Was it the speed, trajectory, spin, release time, etc.? And what caused it — stick flex, weight, balance, curve, length, inertia or player technique? These factors tend to be difficult to dissect and separate, given that they all interact so quickly.
That is why researchers do controlled experiments to determine what changes and by how much when one variable is changed and all others held constant. It is very difficult to control variables when players are the subjects of experiments. That is one reason that researchers have come up with conflicting results as to which hand position or flex produces the most puck velocity and whether or not preloading will always produce a faster shot.
The experiments here attempted to control the input parameters such that definitive statements could be made concerning variables of interest. The conclusions were unambiguous under the range of conditions tested — preloading, softer sticks, and higher hand position produce more puck speed. Furthermore, hand position and stiffness variation along the stick alter the kick point, which is a popular parameter of feel of the stick.
The question is whether comparable conditions are produced during hockey play? For example, the experiment shows that given equal swing energies, higher hand position will lead to greater stick deflection, more energy storage and return, and greater puck velocity. But, given the practical mechanics involved in swinging a stick in game situations, how high can a player hold the stick and generate as much (or enough) stick speed and bending force to achieve more puck velocity? What the experiments do tell us is that over the range of hand variation in which the player can generate such speed and force, puck velocity will be greater. Further, a player's ability will determine one's success at implementing the entire preloading phase. Performed or timed incorrectly, puck speed may actually decrease. And, ironically, some players react to a stiffer stick by putting more force into bending it, so they get just as much or more velocity than they do with a softer stick.
Experiments like this allow us to identify the properties and performance of sticks under conditions intended to implement a desired result. However, the player may or may not be able to approximate those conditions, due to ability, physiology, mechanics, or game context.
5. APPENDIX
Effective Mass. The tip or blade is at the far end of the stick. Most of the mass of the stick is located far away from the puck. How much of this mass is actually involved in the collision? The answer is known as the "effective mass" (M e). This is essentially how much of the entire mass was used in order to account for the momentum gained by the struck object. For most hockey sticks, the effective mass is about the same as the puck: 170 g. The mass of most performance sticks is around 450 g, so the effective mass is usually around 35-40% of the actual mass.
Effective mass can be determined in a couple of ways. It can be derived from the equation
(8) Me = MIcm / (Icm + Mb2)
where Icm is the moment of inertia about the center of mass, M is the mass of the stick, and b is the distance from the center of mass to the impact location. The disadvantage of this method is that it can be difficult to measure Icm. To find the moment of inertia about an axis a, the stick is swung as a pendulum and the period of one oscillation is measured. Ia is then calculated using
(9) Ia = T2MgA / 4π2
where T is the period, M the mass, g the acceleration due to gravity, A the distance from the center of mass (the balance point) to the axis of rotation.
Then to find the moment of inertia about the center of mass, the parallel axis theorem is used:
(10) Icm = Ia - MA2)
where M is the mass of the pendulum and A the distance between the center of mass and the axis of rotation.
The second method of measuring effective mass is to do so using the results of a collision. This method requires that there be no external forces and is given by
(11) Me = mv2 / (V1 - V2)
This method calculates what the mass must have been in order to have produced the measured velocities.
References
1. R. Anderson and L. Smith, “Experimental Characterization of Ice Hockey Sticks and Pucks,” Journal of ASTM International, 6(7), 1-8 (2009).
2. B. Kays and L. Smith, “Field Measurements of Ice Hockey Stick Performance and Player Motion,” Procedia Engineering 72, 563-568 (2014).
3. K.V. Lomond, R.A. Turcotte, and D.J. Pearsall, “Three-dimensional Analysis of Blade Contact in an Ice Hockey Slap Shot, in Relation to Player Skill,” ISEA Sports Engineering 101, 87-100 (2007).
4. A.Villasenor, R.A. Turcotte, and D.J. Pearsall, “Recoil Effect of the Ice Hockey Stick During a Slap Shot,” Journal of Applied Biomechanics 22, 202-211 (2006).
5. J.T. Worobets, J.C. Fairbairn, and D.J. Stefanyshyn, “The Influence of Shaft Stiffness on Potential Energy and Puck Speed During Wrist and Slap Shots in Ice Hockey,” ISEA Sports Engineering 9, 191-200 (2006).